Recently I’ve seen a few LinkedIn conversations about whether the mining industry is spending enough money on Research and Development (R&D). Usually when one thinks of R&D, one might envision the development of new technology, new drug, equipment or software.
I would suggest that mineral exploration should be viewed through the R&D lens. Exploration (or acquisition of explorers) is the most significant way that the industry can self-manage to grow revenues. If exploration is R&D, that then leads to the observation that Junior Miners are the precursors for today’s Silicon Valley startups.
Before venture capital and “startup culture” became a phenomenon, junior mining companies were already operating on the startup core principles. Small, capital driven explorcos were based on unproven assets, led by specialized technical teams. They were funded by investors accepting risk in the hopes for 10 bagger or 100 bagger upsides. This is effectively the same business model that Silicon Valley would build upon.
This blog post examines whether the junior mining industry was a leader in Tech Startup culture. Even things like the Lassonde Curve and the PEA have their comparables in the current tech world.
Are Junior Miners precursors to Tech Startups
 Junior mining companies and Tech Startups share numerous similarities, although they operate in very different worlds. The following comments should recognize that junior mining ecosystem has been around for generations, long before the birth of tech ecosystems.
Junior mining companies and Tech Startups are both high-risk, high-reward ventures. Junior Miners and Tech Startups are early-stage companies where the vast majority fail. Investors accept enormous risk in exchange for the possibility of enormous returns if a discovery or product is a resounding success. Lets look at some of the similarities.
-
A startup spends years (and millions of dollars) building an MVP (Minimum Viable Product). If the market doesn’t want it or the tech fails to scale, the company goes to zero. Similarly if holes don’t hit or the metallurgy is too complex, the mining asset can face significant headwinds.
-
Both mining and tech are essentially “concept” or “pre-revenue” gambles. A Junior Miner typically has no producing mine, just exploration assets and the dream of an economic mineral deposit. Similarly, many Tech Startups have no revenue, just a product idea or some early traction. Investors in both cases are betting on the team and its future value, not on the non-existing cash flow.
-
Both burn through cash (lots of it) before generating revenue. Mining juniors need constant financing rounds (placements) to fund exploration; startups need financing rounds for R&D and growth. Neither can easily self-fund, although bootstrapping is more common in tech than in mining. Both may rely on exit strategies consisting of acquisition from larger industry players.
-
Both generate proprietary data. A Junior Miner’s most valuable asset is often its geological data (drill results, resource estimates, land tenure). A Tech Startup’s asset is its IP, code, or trade secrets. In both cases, the assets are largely intangible until proven economic.
-
Both rely on quality founders and management. A small, skilled team can make or break the company. A geologist or executive with a great track record (“the Midas touch”) is analogous to a serial tech founder. Often the investors are backing the person more than the project.
-
Both sectors are heavily sentiment-driven (mining likes 2025, tech not so much). A hot commodity cycle floods junior mining with capital. A hot tech cycle (AI, crypto, SaaS) floods startups. When investor sentiment reverses, funding dries up fast and many companies are left to die, possibly to rise again in the next cycle.
-
Both sectors can follow the “Lassonde Curve” (mining) or the “Hype Cycle” (tech). There is an initial surge of excitement during discovery/launch, followed by a “boring” period of technical de-risking (development/user acquisition), and finally a re-rating once they reach production or profitability. (More on the Lassonde Curve later in this blog post).
-
Both sectors require pitching their story to investors. The Tech Startups rely on pitching to angel investor via shows like Shark Tank, pitch summits (t) using 5 minute elevator pitches (“get to the point” pitches). The Junior Miners rely on the numerous mining conferences like PDAC, Mines & Money, Beaver Creek, Zurich, again relying on the PowerPoint pitch to gather eyeballs.
Obviously we should also point out there some differences between juniors and Tech Startups.
-
Juniors work with physical geological reality. You either find the ore body or you don’t. Startups can pivot; geology can’t.
-
Mining has far longer timelines; discovery to production can take 10–20 years vs. a startup’s typical 5–7 year VC cycle. Any longer than that, and a Tech Startups technology can become obsolete.
-
Regulatory, environmental permitting, and social license is a constraint for miners with no real startup equivalent. Viable exploration projects can get blocked through no fault of the miner itself.
-
Junior Miners are more commodity-price dependent. Even a great deposit can be uneconomic at the wrong metal price. Conversely a miner’s asset could become more valuable over time based on metal prices. Tech startup do not rely on a commodity price outside their control.
-
Junior Miners tend to rely on public capital markets for financing right from the start, although the trend toward private equity mining investment may be increasing. Conversely, at early stages, Tech Startups tend to be bootstrapped and financed via private equity, venture capital, and angel investors. Junior Miner investments can provide more liquidity and exit opportunities due to their public listing. Tech investors may be locked in until a liquidity event occurs.
-
The startup world will label their financing rounds (seed, Series A, Series B,..) with the hope that future investors provide financing at higher valuations than earlier investors. The mining industry does not label their placement rounds – perhaps they should.
In conclusion, an analogy between Junior Miners and Tech Startups can help outsiders understand the risk, capital structure, and investor behavior of both industries. One might conclude that Junior Miners were the Tech Startups of decades prior, and are still functioning that way today.
Should exploration expenses be considered R&D
 Exploration spending shares some of the same characteristics of more commonly R&D.
R&D is uncertain in outcome, generates intellectual property (geological data, resource models), and is expensed before any revenue is realized. A pharma company doesn’t know if a new drug will be a win, similarly a Junior Miner doesn’t know if a drill program will yield an economic deposit. Both activities are investments in discovering something of future value, hopefully.
R&D is about de-risking a concept, and de-risking is a term commonly used by Junior Miners. Every drill hole, soil sample, and geophysical survey is a data point that builds knowledge, and even uneconomic drill holes provide value by focusing the search area.
Much like our drug development example, exploration has a high-failure, high-reward path. Early-stage “lab work” (geochemistry/geophysics) leads to “clinical trials” (core drilling) and eventually “commercialization” (feasibility and production).
There are also some differences between exploration and conventional R&D. R&D will typically create proprietary intellectual property, like a new drug or software platform that can be replicated and marketed globally. A mineral discovery is a unique, non-replicable physical asset in a given location. R&D in tech is about creating something from nothing (innovation), while exploration is about finding something that already exists (discovery).
Exploration also tends to be more binary since it is geologically constrained. You either find an ore body or you don’t. You can’t modify or pivot with an orebody. On the other hand, drug and software R&D can yield partial successes or new technologies, that may have other applications.
Although there are both similarities and differences, the analogy is interesting. Exploration may be considered as a hybrid since it has the uncertainty and knowledge-creation aspect of R&D, but the result is a unique physical asset and not IP. In my view exploration is equivalent to R&D.
Lassonde Curve vs Hype Cycle Curve
As mentioned previously, junior mining and Tech Startups will follow a cyclic path of hype and despair. In mining it is known as the “Lassonde Curve” and in tech its called the “Gartner Hype Cycle”. Let’s look at the similarities. Which came first?
The Lassonde Curve is the “elder” of the two models, predating the Gartner Hype Cycle by about a decade. I had written a previous blog post on this at Mining’s Lassonde Curve – A Wild Ride.
The image below shows them side by side, and they do look similar. While both charts effectively track the “rollercoaster” of investor psychology and technical de-risking, they emerged from different eras and industries. Both charts have a x-axis that represents time and both have a y-axis that represents expectation ( stock price can be viewed as a measure of expectation).
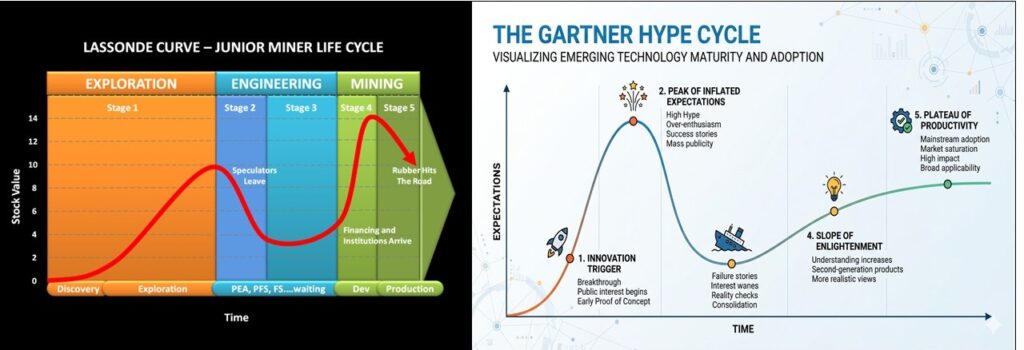
1. The Lassonde Curve (developed in late 1980s)
Created by Pierre Lassonde, the legendary mining financier and co-founder of Franco-Nevada. The model explains the life cycle of junior mining stocks to investors, explaining why sometimes investors get burned after a discovery even if the project is technically sound.
2. The Gartner Hype Cycle (developed in 1995)
Created by analyst Jackie Fenn at the technology research firm Gartner to help clients distinguish between the “hype” of a new technology and its actual commercial maturity. The model guides corporate IT departments on when to invest in new technologies (e.g., AI, Cloud, VR) without getting burned by the “Peak of Inflated Expectations.”
Does the Gartner HC model use the earlier Lassonde Model as a template? Both models show that humans tend to over-speculate on “newness” (whether it’s a drill hole hit or a new technology) and then lose interest when the hard work begins. It seems that Pierre Lassonde mapped that human behavior a few years before the tech world did. In this aspect, the understanding of investor behavior in junior mining was leading the way for Tech Startup behavior.
Is a PEA Study Like a Tech Product Market Fit (PMF) Study
 Another similarity between junior mining and tech world is in the way early-stage viability is assessed. This is required to decide whether millions of dollars of further investment is warranted. Miners will complete a PEA. Startups will complete Product-Market Fit research.
A Preliminary Economic Assessment (PEA or scoping study) is an early-stage technical and economic evaluation of a mineral deposit. Its core purpose is to determine whether a project is potentially viable before committing significant capital to more advanced studies.
Product-Market Fit (PMF) research for a Tech Startup is a structured effort to determine whether a product satisfies a strong market demand. The goal isn’t just to confirm PMF exists; its to understand the who, why, and how it will work before committing to aggressive growth.
Comparing a Preliminary Economic Assessment (PEA) to a Tech Startup’s Product-Market Fit (PMF) stage is a great way to see how both industries similarly “de-risk” an idea before committing big money.
In both worlds, this is the moment where one stops saying “We have a cool idea or a nice deposit” and start saying “We have a viable business.”
1. The “Does This Thing Actually Work?” Test
– Tech (PMF): Once the team has built a beta, they can see if people are using it and are willing to pay for it. They need to prove there is a market for the tech.
– Mining (PEA): The team has found a deposit. The PEA is the first time they can put a dollar sign on it. It’s a conceptual study that predicts “If we build a mine here with these current economic inputs, it should make money.”
2. The Shift from “Geology” to “Economics”
Just as a Tech Startup shifts from coding to customer acquisition cost (CAC), a Junior Miner shifts from geology to metallurgy and CAPEX.
– Tech: It doesn’t matter how good the code is, if it costs >$50 to acquire a customer who only spends $5 it will not be a viable venture.
– Mining: It doesn’t matter if you have 2 million ounces of gold if the rock is difficult to process or if the project costs billions to build. The PEA is the first reality check on these costs.
3. Attracting the Investors
The PEA / PMF stage may be the ultimate gatekeeper for many institutional capitalists.
– Tech: Once you deliver a PMF, Venture Capital (VC) firms may be more willing to provide growth capital to scale the business.
– Mining: Once a positive PEA is released, the company may see a “re-rating.” Larger funds and mid-tier miners may start looking at the project as a real asset rather than just a speculation.
In closing, It is important to remember that both PEA / PMF stages are still early. A tech company with PMF can still be crushed by a competitor or a change in regulatory or platform privacy requirements. A mining project with a PEA can still fail if the Pre-Feasibility Study (PFS) reveals that the environmental permitting or economic factors are not as expected. Neither early stage study is a guarantee for future success, which is another similarity between the two sectors.
Conclusions
There are many parallels between Junior Miners and Tech Startups. The similarities are in how they are built, how they function, and how they acquire funding.
In that way, exploration expenditures can also be viewed through the lens of R&D spending. So it may be improper for some to suggest that the mining industry is not spending enough on R&D, when it actually is spending huge amounts on R&D.
The Junior Mining industry has been around much longer than the Tech Startup world, and hence have led the way in building an ecosystem for speculative investment.
Is it cool to work in the startup world? The answer is yes if its tech, and (unfortunately) no if its mining.
**end**

 This article is about the benefit of preparing (cutting) more geological cross-sections and the value they bring.
 Long sections are aligned along the long axis of the deposit. They can be vertically oriented, although sometimes they may be tilted to follow the dip angle of an ore zone.
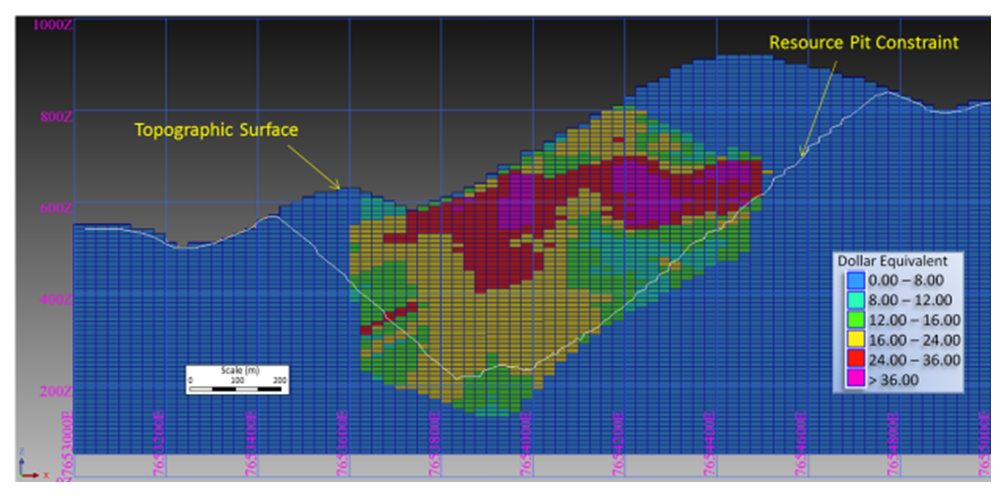 Cross-sections are generally the most popular geological sections seen in presentations. These are vertical slices aligned perpendicular to the strike of the orebody. They can show the ore zone interpretation, drill holes traces, assays, rock types, and/or color-coded resource block grades.
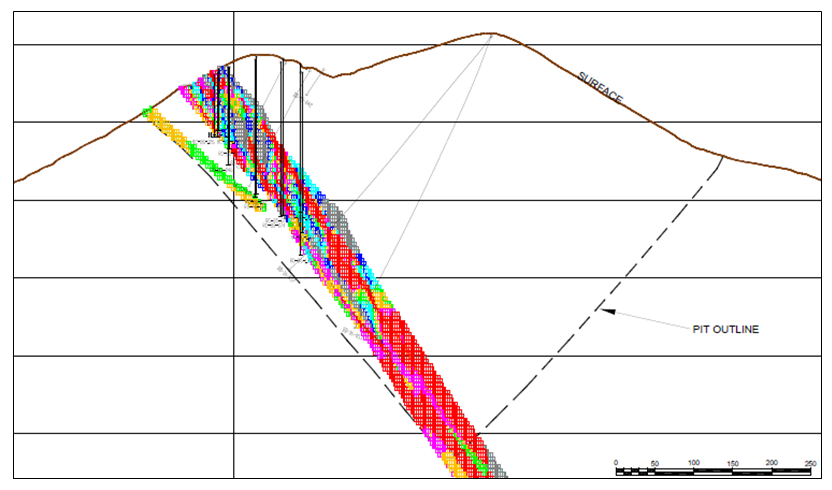 When looking at cross-sections, it is always important to look at multiple cross-sections across the orebody. Too often in reports one may be presented with the widest and juiciest ore zone, as if that was typical for the entire orebody. It likely is not typical.
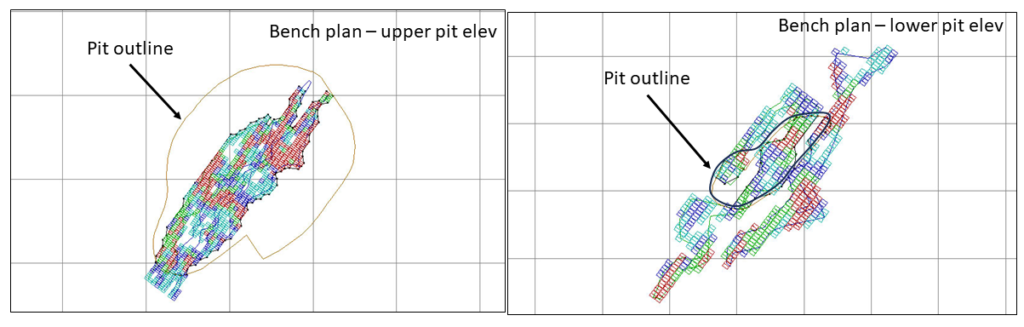 Bench plans (or level plans) are horizontal slices across the ore body at various elevations. In these sections one is looking down on the orebody from above.
 3D PDF files can be created by some of the geological software packages. They can export specific data of interest; for example topography, ore zone wireframes, underground workings, and block model information. These 3D files allows anyone to rotate an image, zoom in as needed and turn layers off and on.
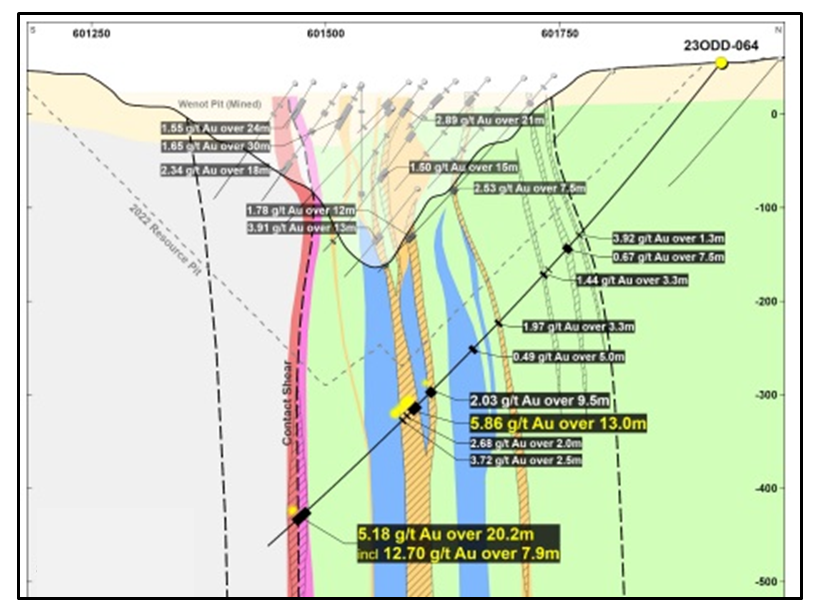 The different types of geological sections all provide useful information. Don’t focus only on cross-sections, and don’t focus only on one typical section. Create more sections at different orientations to help everyone understand better.


 I am not going into detail on Paul’s paper, however some of my key takeaways are as follows. Download the paper to read the rationale behind these ideas.
 The bottom line is that not everyone will necessarily agree with all the conclusions of Paul’s paper on underground dilution. However it does raise many issues for technical consideration on your project.